Dreamcast tutorial: How to extract and recompile a CDI Image

If you've ever wanted to try modding Dreamcast games, then this is where to start
EXTRACTING
To start, extract all of the tools in the toolkit attached below into the root of your hard drive. For example purpose of this guide, we will assume this is called "C:\"
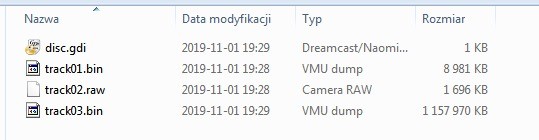
Move your CDI disc image file to the cdirip folder
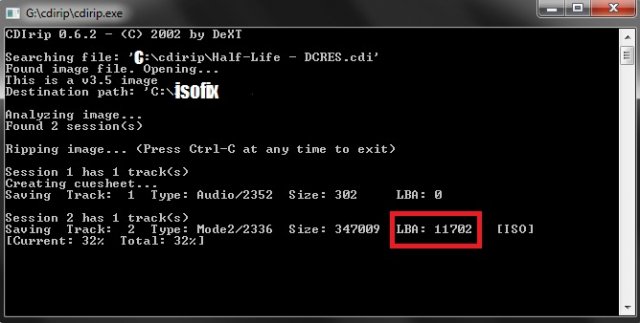
Double click the cdirip exe in the cdirip folder and point it to your CDI disc image file. When it asks the destination folder, point it to "C:\isofix"
Take note of the LBA value in track 2

Next, go into the 'isofix' folder. There will now be a filed called "bootfile.bin". Rename this to "ip.bin" and save it to a new folder "C:\discroot"
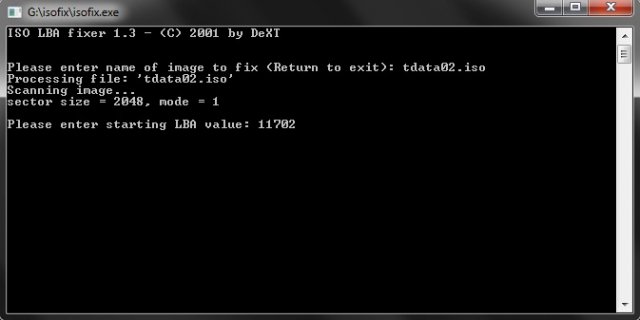
Double click 'isofix.exe'
When it asks for the iso file to fix, input "tdata02.iso". It will then ask for the LBA value, this is the LBA noted before. In this case input "11702"

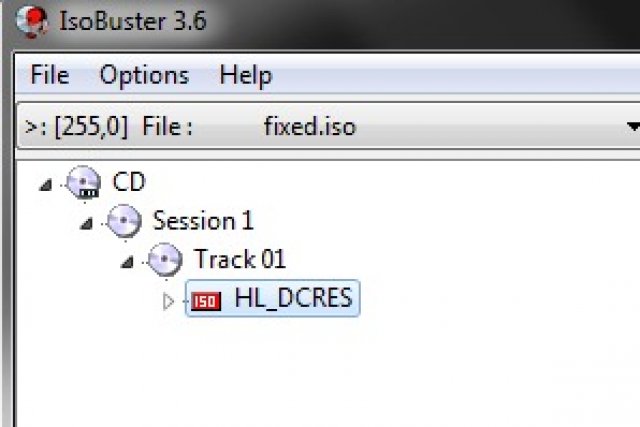
Now install the ISObuster. The installation file is included in the toolkit attached below. Once you have done that, open ISObuster. Then open "fixed.iso" in "C:\isofix"
Navigate to CD --> Session 1 --> Track 01 and click the red "ISO" icon

Highlight all files and right-click, select "Extract Objects"
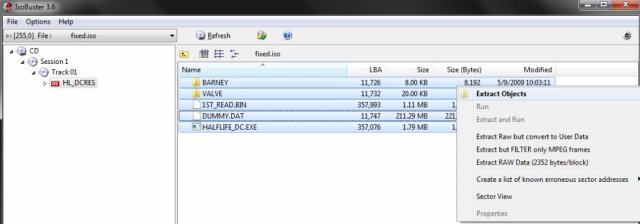

Select "C:\discroot" as the destination folder
Lastly, right-click the red "ISO" icon and navigate to "Folder tree and file information --> List tree-info (in txt file) --> LBA Full Path"
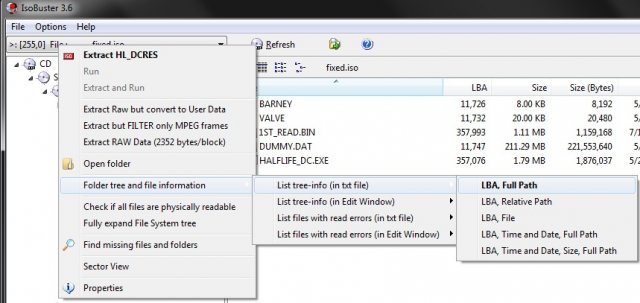

Save FileList.txt in the "sortfile" folder included in the toolkit. Which should be in "C:\sortfile"
The image is now properly extracted
Recompiling
Once you have made your modifications, you will then have to recompile the CDI image
First, we need to prepare the sort file. Open the "C:\sortfile" and double click "listorganizer.au3"
Select the FileList.txt file from before. It will then output your sort file called "output.txt"
Move "output.txt" to "C:\mkisofs"
Open output.txt and add the following line
>:\IP.BIN 30001THE SPACE IS IMPORTANT
If you removed or added a significant amount of data. It may be necessary to make a new DUMMY.DAT file to reflect the current amount of data. If you would like to do this then download and install "BootDreams". On the top menu bar navigate to "Extras --> Dummy file --> Custom MB" and input "670"
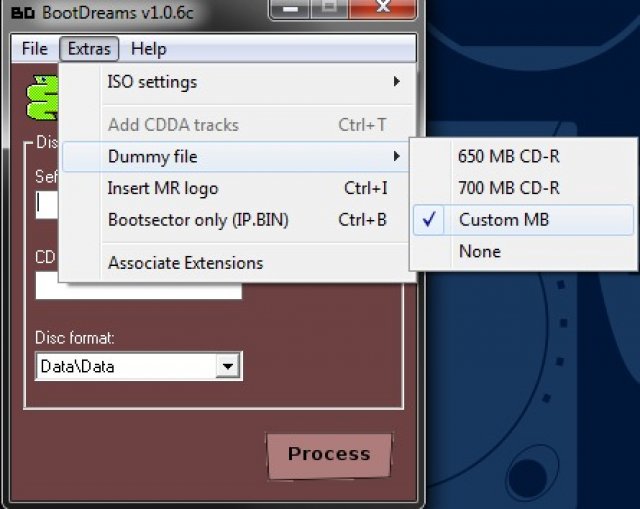


Select "C:\discroot" as the selfboot folder, input anything as the disc label and click "Process". When it brings up the box to save the CDI file exit BootDreams. As it will have already created your new DUMMY.DAT file. Just rename it from DUMMY000.DAT to DUMMY.DAT
Now click the Windows start button. Then type "cmd" and press enter
Now type
cd c:\mkisofsFollowed by
mkisofs -C 0,11702 -V MODDED_CDI -sort output.txt -l -o new.iso c:\discroot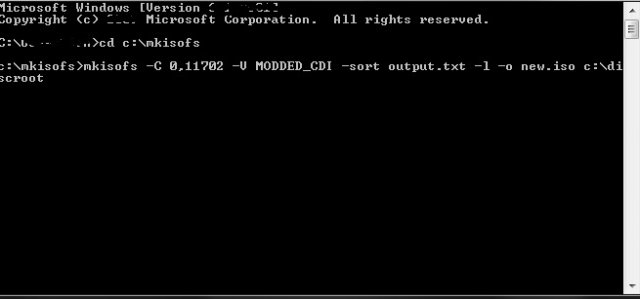

Then move "new.iso" from "C:\mkisofs" to "C:\isofix"
Open isofix.exe again, enter "new.iso" with LBA "11702"
Depending on how many files you added, you can open ISObuster again, generate a new "FileList.txt" then run "listorganizer.au3" and compile a new ISO with the new sort. I always do this, but it may not be needed.
Lastly, copy "fixed.iso" to "C:\bin2boot"
Open bin2boot.exe and enter "fixed.iso"
Your new CDI file will be generated and ready to burn


Comments