NEOchrome for Atari


Introduction
NEOchrome is a painting program for the low resolution mode of the Atari 520ST personal computer system. NEOchrome uses many of the features of the ST's GEM system. With NEOchrome you can create colorful full-screen pictures and save them to disk for use in other programs or with the NEOchrome slide show program (SLIDENEO.PRG).
Terms Used
When we use the word SELECT, click the left mouse button once while pointing at a specified object on the screen. RIGHT SELECT indicates that you should click the right button once. DRAG indicates that you hold down the left button and slide the mouse, while RIGHT DRAG is the same function with the right button. DOUBLE-CLICK indicates that you must click the left button twice rapidly.
To Install
Place the NEOchrome disk in the drive and double-click on the drive icon to get the directory to appear. Select the NEO.PRG icon to highlight it, then move the pointer up to the OPTIONS menu. Select INSTALL APPLICATION. With the keyboard, type NEO, then move the pointer to OK and click once (do not hit the RETURN key, which will cancel the installation). Now NEOchrome is installed so you can work with previously created pictures easily.
To Start
Just double-click on NEO.PRG. After a few seconds the screen background will turn black and the NEOchrome screen appears. Now you can start a new drawing.
To start with a previously-saved screen, double-click on the name of that picture instead of NEOchrome. If you get a dialog box with the choices "SHOW, PRINT, CANCEL", that means that NEOchrome needs to be installed -- use the instructions above to install NEOchrome, then double-click on the picture name.
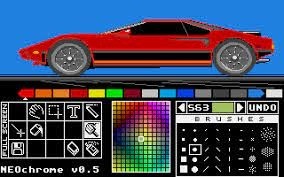
The NEOchrome Menu
The lower half of the screen contains the NEOchrome menu, a collection of icons that represent the functions available. The top edge of the menu area shows the 16 colors in the color palette. The left side of the menu contains the tools, shown in a 3 by 5 grid. The middle of the menu area scrolls through all the ST's colors and magnifies the drawing area. The right side of the menu area shows options depending on the tool that is currently selected. Above the options area is the color mixer and the UNDO box.
Full Screen and Half Screen Display
NEOchrome pictures occupy a full screen. To see the entire screen, move the pointer to the left of the icon area onto the "FULL SCREEN" box and click once. To return to the half screen/menu display, move the pointer until it is on any corner of the screen and click again. The "Esc" key on the keyboard also switches between the two displays.
Scrolling Vertically
When in the half screen display, you can scroll the visible area of the picture up and down. The GRABBER (row 1 column 2) performs this function. First select the grabber, then drag the image up and down.
The Color Palette
You can choose any combination of the ST's 512 colors to fill the 16 color palette. First select which palette color to change by selecting it. A small triangle appears below that color to indicate that the palette position is now selected. This color is used for any drawing operation until you select a different palette color.
Some of the palette positions are used by NEOchrome for specific screen and border. The rightmost palette color is used for the cursor. The text cursor alternates between these two colors.
One way to change a palette color is to pick one from the color map window. You can view all the ST's 512 colors by scrolling through them -- just right drag the color map from side to side. Select the individual color you want. The color now appears in the mixer area (upper right side of menu area). If that is the desired color, double-click and that color fills the selected palette position.
The other way to change the color in the palette is to use the mixer. Move the pointer up to the three digits, which represent the red, green, and blue values respectively for the color (the same values you would see on the CONTROL PANEL desk accessory). With the pointer positioned over one of the digits, clicking the left button makes the digit increase and clicking the right button makes it decrease. The color color appears in the small window to the right of the digits. When the color reaches the desired shade, udouble-click the left button on the window to get that color into the palette.
UNDO
The UNDO box on the screen (or the UNDO key on the keyboard) will erase the last drawing operation performed. If you make a mistake, use UNDO. If you didn't mean to UNDO the operation, hit UNDO once more and to "undo" the UNDO!.
The Tools
First choose a color from the palette by selecting it -- triangle appears below it.
PENCIL (row 1 column 5): Select the pencil, then drag to draw or right drag to erase pixel by pixel (actually this draws in the background color). For better accuracy, you can watch the magnify window at the center of the menu area, which appears whenever the pointer is in the image area.
ERASER (row 3 column 4): Select the eraser then drag to erase broad areas of the picture. Double-click on the ERASER tool to erase the entire visible area of the picture.
LINE DRAW (row 2 column 1): Select the line draw tool, then drag to see the line and let go of the button to leave the line in position (or click the right button to abort the line). Right drag to create a "ramp line" made up of the colors between the color ramp pointers (notches on the palette). To move these pointers, right drag them from side to side.
AREA FILL (row 2 column 2): Select this tool to fill an area with a solid color. The bottom "droplet" from the icon shows which pixel is used for the fill operation -- the mangifier is helpful for better accuracy in filling an area. Be sure that the area to be filled is completely enclosed or the color will "leak out" into other areas of your drawing -- use UNDO if this happens and use the pencil to touch up your borders.
PAINT BRUSH (row 2 column 5): Select this to paint using various size and shape of brush. The brushes are selected in the OPTIONS area. Drawing with a paint brush is similar to the PENCIL tool.
SPRAY CAN (row 3 column 5): Select this for an airbrush effect. Select the nozzle from the OPTIONS area. There are four "speeds" for a paint spray. Left drag for the faster rate and right drag for a slower rate, with both speeds increased when using the full-screen display.
TEXT (row 1 column 4): Select TEXT then select a starting position on the screen. You will see a flashing text cursor. Typing on the keyboard now puts text on the screen. You can move the pointer at any time to the options area and change the type size, style, and alignment on the screen. You can also change the color of the text while creating it. Hit backspace to correct mistakes. You can click on the "system" selection in the options area to toggle the upper half of the system character set.
Copying Parts of the Image
COPY BOX (row 1 column 3) lets you move rectangular parts of the image or copy them to other parts, or even to copy them into other pictures. Select COPY BOX, then drag to surround an area of the image. Release the left button, then drag when the cursor is within the box or cancel the box by clicking outside it.
The right side of the options area shows two icons, the lower for "transparent" copy and the upper for an "opaque" copy. The difference is that the transparent mode does not copy any pixels in the background color, letting underlying pixels show through, while the opaque mode moves every pixel in the rectangle including background spaces.
The left side of the options area shows CUT, COPY, PASTE, and CLEAR. "Clear" removes the contents of the copy box. "Cut" removes the surrouded area and puts it into a special unseen buffer. "Paste" retrieves the area from the buffer. "Copy" puts the surrounded area into a buffer without removing it from the screen. An image that has been placed in the buffer can be retrieved later to place it on the picture, even if a new picture has been loaded from the disk, as long as you have not exited the program.
You can drag the area around and then "stamp" it into the desired position with the right button. If you don't want to remove the area from its original location before moving it, to make several copies of it on the screen, click the right button as soon as you grab the area and before moving it.
Saving, Quitting, and Loading
DISKETTE (row 3 column 1): The diskette is used to exit back to the desktop, save the current image to disk, or to load a new image. To exit or save the picture, select and a dialog box appears to allow you to save, exit the program, or to cancel the dialog box without taking any action.
Right select gives you a menu of all the NEO files on the current directory. You can use this menu to load a different picture, replacing the current one. The contents of the buffer (see "copy box" above) remains intact.
Color Palette Animation
NEOchrome can perform special effects by shifting the colors in the palette. The slide show demo on the NEOchrome master disk animates several of the images like the waterfall by using this technique.
Choose the range of colors on the palette to be shifted by moving the notched pointers on the palette using the right drag, as described in the "ramp line" function above. The arrows on either side of the color mixing area control this. Select the arrow for one shift in that direction, or right select it for a continuous color palette shift. When in continuous shifting, left button clicks speed up the shift and right button clicks slow it down. To stop continuous shifting, select or right select on the opposite arrow.
The SLIDENEO.PRG gives you a slide show which can also animate your colors. To use this feature, the picture must be saved while the colors are scrolling. To program the duration that a picture is presented with the slide show, first set the desired speed, direction, and range of color scrolling. Then stop the scrolling by clicking on the opposite arrow. Each time scrolling is stopped, the time since it was started is remembered by the NEOchrome program, and this amount of time is used for the presentation.
Future Versions
NEOchrome is a product still under development. Features included in version 0.5 are complete, but Atari will continue refining this product and adding many new features during the next few months. Enjoy this "preview" version for now, and watch for the final version when it is ready.
Credits:
NEOchrome designed and programmed by Dave Staugas
Pictures drawn by Jerome Domurat
Manual by Neil Harris